

Welcome to our comprehensive DIY Garage Door Adjustment Guide. In this guide, we will provide you with easy-to-follow tips for adjusting your garage door on your own. Whether you’re looking to perform basic maintenance or tackle common repair issues, our guide will help you keep your garage door in optimal condition without the need for professional assistance.
Regular garage door maintenance is essential for ensuring its proper functioning and longevity. By following the tips and techniques outlined in this guide, you can save both time and money, while also avoiding potential safety risks associated with a malfunctioning garage door.
From adjusting the tension to fixing alignment issues and troubleshooting your garage door opener, we will cover a range of topics to empower you with the knowledge and skills to take care of your garage door.
So, let’s dive into our DIY Garage Door Adjustment Guide and learn how to maintain and repair your garage door effectively.
Key Takeaways:
- Performing regular garage door maintenance can help prevent costly repairs.
- Adjusting the tension ensures smooth operation and prevents the door from being too heavy.
- Fixing alignment issues is important for the proper functioning of the garage door.
- DIY adjustments to your garage door opener can improve its performance.
- Regular troubleshooting and maintenance will help extend the lifespan of your garage door.
Adjusting Garage Door Tension
Proper garage door tension is essential for smooth and safe operation. If your garage door is too heavy or difficult to open, it’s likely due to imbalanced tension. In this section of our DIY garage door adjustment guide, we will explain the importance of adjusting garage door tension and guide you through the process step by step.
Adjusting the tension of your garage door involves tightening or loosening the springs. This task requires careful attention to ensure the door is properly balanced. Follow the steps below to adjust the tension:
- Start by closing the garage door completely and unplugging the opener to avoid any accidents.
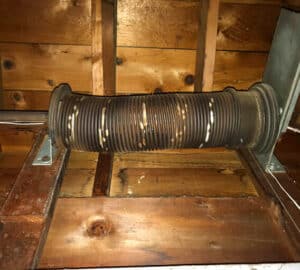
- Locate the torsion springs, which are usually located above the door. These springs are under high tension, so proceed with caution.
- Use a winding bar to insert into one of the winding cone holes on the spring. Hold the bar securely and minimize any sudden movements.
- To increase tension, turn the winding bar in a clockwise direction. For decreasing tension, turn the bar counterclockwise.
- Rotate the bar gradually, making small adjustments at a time. Test the door’s balance periodically to ensure it operates smoothly.
- Continue adjusting until you achieve the desired tension and balance.
It’s important to note that adjusting garage door tension can be dangerous if not done correctly. If you are unsure or uncomfortable performing this task, it’s best to seek the assistance of a professional garage door technician to avoid potential hazards.
| Pros of DIY Garage Door Tension Adjustment | Cons of DIY Garage Door Tension Adjustment |
|---|---|
|
|
Remember, adjusting garage door tension should only be attempted if you have the necessary knowledge and skills. Safety should always be the top priority. If you are uncertain or uncomfortable with the process, it’s best to consult a professional garage door technician for assistance.
Fixing Garage Door Alignment
Proper alignment is essential for the smooth operation of your garage door. If you notice any issues with the alignment, such as the door being uneven or rubbing against the tracks, it’s important to address them promptly. In this section of our DIY garage door adjustment guide, we will provide step-by-step instructions to help you fix garage door alignment problems and adjust the tracks.
Identifying Alignment Problems
Before you start adjusting the tracks, it’s crucial to identify the specific alignment problems your garage door may be facing. Here are some common signs of misalignment:
- The door is crooked and doesn’t close or open smoothly
- You notice excessive friction or rubbing between the door and the tracks
- There are gaps between the door and the weatherstripping
- You hear unusual noises or squeaking during operation
If you observe any of these signs, it’s likely that your garage door alignment needs adjustment. Follow the steps below to fix the issue.
Adjusting the Tracks
Before starting the adjustment process, make sure to wear protective gloves and safety glasses. You will need a few tools for this task, including a wrench, level, and a rubber mallet. Here’s a step-by-step guide to adjusting the tracks:
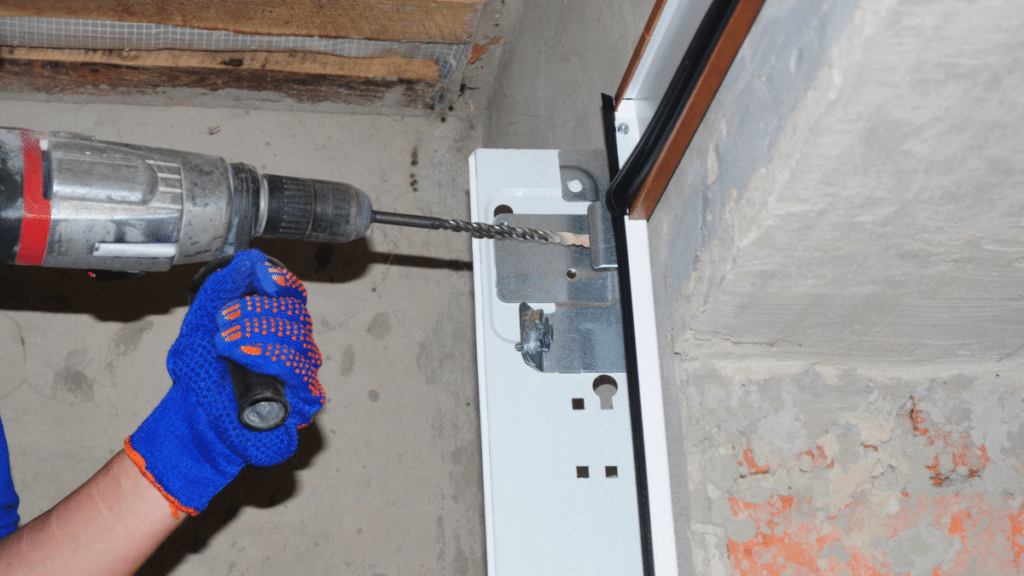
- Inspect the tracks for any debris, rust, or loose hardware. Clean the tracks thoroughly and tighten any loose bolts or screws.
- Using a level, check the vertical alignment of the tracks on both sides of the door. Adjust the track brackets if necessary to ensure they are plumb.
- Next, check the horizontal alignment of the tracks. Use the level to ensure they are perfectly horizontal. If needed, loosen the bolts holding the tracks and gently tap them with a rubber mallet to align them correctly.
- Once the tracks are properly aligned, tighten all the bolts and screws securely.
- Test the door’s operation to ensure smooth movement. If there are any lingering alignment issues, repeat the adjustment process until the door operates smoothly.
Remember, proper alignment is crucial for the optimal performance and longevity of your garage door. By following these simple steps, you can fix garage door alignment issues and ensure your door operates smoothly and safely.
| Benefits of Fixing Garage Door Alignment | Tips to Avoid Future Alignment Issues |
|---|---|
| 1. Smooth operation and reduced friction | 1. Regularly clean and lubricate the tracks |
| 2. Increased lifespan of the garage door | 2. Check for loose hardware and tighten as needed |
| 3. Enhanced security and safety | 3. Avoid excessive force when opening and closing the door |
DIY Garage Door Opener Adjustment
Is your garage door opener not working as smoothly as it used to? You don’t need to call a professional just yet. With some simple adjustments, you can maximize the performance of your garage door opener on your own. Our DIY garage door adjustment guide provides tips and troubleshooting techniques to help you get your opener back in top shape.
Adjusting the Sensitivity
One common issue with garage door openers is incorrect sensitivity settings. If your opener doesn’t respond correctly or reverses unnecessarily, it may be a sensitivity problem. Follow these steps to adjust the sensitivity:
- Locate the adjustment screws or dials on your opener unit.
- Using a screwdriver or a small tool, turn the adjustment screw or dial gradually until the door operates smoothly.
- Test the door by closing and opening it multiple times, making further adjustments if necessary.
Troubleshooting Common Issues
In addition to sensitivity adjustments, there are a few other common issues that you can troubleshoot yourself:
- If your garage door opener remote isn’t working, check the batteries and replace them if needed.
- If the door operates intermittently, make sure there are no obstacles blocking the sensors.
- If the door opens or closes partially, check for any debris or obstructions along the tracks that may be affecting its movement.
By following these DIY tips, you can save time and money while ensuring your garage door opener functions smoothly. Remember, if you’re unsure or uncomfortable with making adjustments yourself, it’s always best to consult a professional.
| Common Garage Door Opener Issues | Possible Solutions |
|---|---|
| The garage door opener doesn’t respond to the remote | 1. Check the batteries in the remote and replace if needed 2. Reprogram the remote according to the manufacturer’s instructions |
| The door reverses unnecessarily | Adjust the sensitivity settings of the opener unit |
| The door opens or closes partially | 1. Clear any obstructions on the tracks 2. Wipe down the tracks to remove debris 3. Check the alignment of the tracks |
Conclusion
In this DIY garage door adjustment guide, we have covered various aspects of maintaining and troubleshooting your garage door. By following these easy tips, you can save yourself time and money while ensuring the longevity of your garage door.
One of the crucial adjustments we discussed is the DIY garage door spring adjustment. By understanding how to adjust the tension of your garage door springs, you can prevent issues such as excessive noise, uneven movement, or even complete failure.
Additionally, regular garage door troubleshooting is essential to address common issues like misalignment, tracks, or opener problems. By learning how to identify and fix these issues on your own, you can keep your garage door functioning smoothly and avoid unnecessary repairs.
Remember, proper maintenance is key to keeping your garage door in optimal condition. By regularly inspecting and lubricating the moving parts, tightening loose hardware, and checking the balance and alignment, you can ensure that your garage door operates efficiently and safely.
Keep this DIY garage door adjustment guide handy for future reference, and you’ll be equipped with the knowledge and confidence to handle basic maintenance and troubleshooting tasks on your own. By taking proactive steps, you can extend the lifespan of your garage door and enjoy reliable functionality for years to come.
FAQ
How often should I perform maintenance on my garage door?
It is recommended to perform regular maintenance on your garage door at least once a year. This includes lubricating moving parts, inspecting and tightening hardware, and checking the balance and alignment of the door.
How can I adjust the tension of my garage door?
To adjust the tension of your garage door, locate the tension adjustment screws on the garage door springs. Turn the screws clockwise to increase tension and counter-clockwise to decrease tension. Make small adjustments and test the door’s balance after each adjustment.
What can I do if my garage door is not aligning properly?
If your garage door is not aligning properly, start by inspecting the tracks for any obstructions or debris. Clean the tracks and use a level to ensure they are properly aligned. If needed, loosen the mounting brackets and carefully adjust the tracks until the door runs smoothly.
How can I adjust my garage door opener settings?
Most garage door openers have adjustment settings for sensitivity, force, and travel limits. Refer to your opener’s manual to locate these settings and follow the instructions to make the necessary adjustments. Testing the door’s operation after each adjustment is recommended.
Can I adjust the tension of my garage door springs on my own?
Adjusting garage door springs can be dangerous and should be left to professionals. These springs are under high tension and improper adjustment can cause serious injuries. It is recommended to hire a trained technician for spring adjustments or repairs.