

Is your Chamberlain wall control blinking slowly and causing frustration with your garage door opener? Don’t worry, we’re here to help. In this troubleshooting guide, we will provide you with step-by-step instructions on resolving the issue of your Chamberlain wall control blinking slowly. By following our guide, you’ll be able to get your garage door opener back in working order in no time.
Key Takeaways
- Identify the cause of the slow blinking to better understand the issue.
- Check the wiring connections to ensure they are secure and undamaged.
- Clear any sensor obstructions that may be interfering with the wall control.
- Reset the wall control unit by power cycling the opener and reprogramming the control.
- If necessary, replace the wall control unit to resolve the blinking issue.
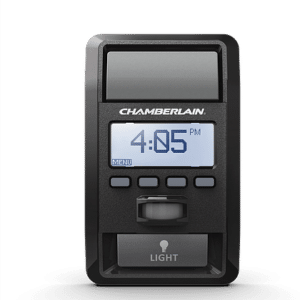
Understanding the Chamberlain Wall Control Blinking
Before we dive into troubleshooting the slow blinking issue of your Chamberlain wall control, it’s important to gain an understanding of why this problem occurs. The slow blinking can be an indication of various underlying issues that need to be addressed in order to resolve the problem effectively.
The slow blinking of your Chamberlain wall control could be due to a faulty wiring connection, sensor obstruction, or a malfunctioning wall control unit. Identifying the root cause of the slow blinking will allow you to take appropriate steps towards resolving the issue.
By understanding the possible reasons behind the slow blinking, you’ll be better equipped to troubleshoot and fix the problem, ensuring the smooth operation of your Chamberlain garage door opener.
Checking the Wiring Connections
One of the first steps in troubleshooting your Chamberlain wall control is to check the wiring connections. Loose or damaged wires can cause the control panel to blink slowly, resulting in a frustrating experience. By inspecting and securing the wiring connections, you can potentially fix the issue and restore the proper functioning of your Chamberlain wall control.
To begin the process, follow these steps:
- Turn off the power to your garage door opener by disconnecting it from the power source.
- Locate the wall control unit and carefully remove the cover.
- Inspect the wires connected to the wall control. Check for any loose or dislodged wires.
- If you find any loose wires, gently tighten them using a screwdriver or pliers.
- Ensure that all connections are secure and properly fastened.
- Replace the cover of the wall control unit.
- Reconnect the power to your garage door opener.
If the slow blinking issue persists after checking and securing the wiring connections, proceed to the next troubleshooting steps. However, if fixing the wiring resolved the problem, congratulations! Your Chamberlain wall control should now function as expected.
“Checking the wiring connections is an essential troubleshooting step in resolving slow blinking issues with Chamberlain wall controls. By ensuring all wires are properly connected and secure, you can eliminate loose connections as the cause and potentially fix the problem without further intervention.” – Chamberlain Support
Note: If you are unsure about working with electrical connections or if the problem persists after checking the wires, it is recommended to seek professional assistance or contact Chamberlain support for further guidance.
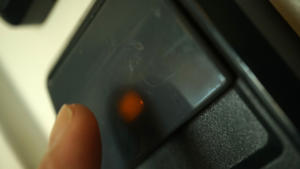
Clearing Sensor Obstructions
Another common reason for a Chamberlain wall control to blink slowly is sensor obstructions. When the safety sensors are blocked or misaligned, it can interfere with the proper functioning of the wall control, causing it to blink slowly. To ensure smooth operation, it is essential to locate and clear any obstructions that may be obstructing the sensors.
Here are the steps to follow in order to clear sensor obstructions:
- Locate the safety sensors: Start by identifying the safety sensors on either side of your garage door. These sensors are usually mounted near the floor and emit an invisible beam of light.
- Inspect the sensor alignment: Check if the sensors are properly aligned with each other. They should be facing each other and their lenses should be clean and free of any dirt or debris.
- Remove any obstructions: If there are any objects, such as boxes, tools, or debris, blocking the sensors, remove them to clear the obstruction.
- Adjust sensor alignment: If the sensors are misaligned, use a level or a measuring tape to ensure they are at the same height and aligned properly. Make any necessary adjustments to align them correctly.
- Test the operation: Once you have cleared any obstructions and aligned the sensors, test the operation of your Chamberlain wall control. It should no longer blink slowly if the sensor obstructions were the cause of the issue.
By following these steps, you should be able to resolve the problem of your Chamberlain wall control blinking slowly due to sensor obstructions. However, if the issue persists, there may be other underlying factors contributing to the blink. In such cases, it is recommended to proceed with the other troubleshooting steps or contact Chamberlain support for further assistance.
Resetting the Wall Control Unit
Sometimes, a simple reset of the wall control unit can resolve the issue of your Chamberlain wall control blinking slowly. By performing a reset, you can help to restore the proper functioning of the unit and eliminate the slow blinking.
To reset the wall control unit, follow these steps:
- Make sure the garage door is closed.
- Locate the power source for your garage door opener.
- Disconnect the power source by unplugging the opener or turning off the circuit breaker.
- Wait for approximately 30 seconds to allow the system to reset.
- Reconnect the power source by plugging in the opener or turning on the circuit breaker.
- Wait for the wall control unit to reset itself, which may take a few moments.
- Once the reset is complete, the slow blinking issue should be resolved.
If resetting the wall control unit doesn’t resolve the blinking issue, you can also try reprogramming the unit. This can help to establish a fresh connection and potentially fix any technical glitches.
To reprogram the wall control unit, follow these steps:
- Press and hold the “Learn” button on the back of the unit for approximately 6 seconds.
- Release the “Learn” button once the LED light on the unit starts blinking.
- On the wall control unit, enter the desired code by pressing the appropriate buttons.
- Press and hold the “Enter” button until the LED light on the unit stops blinking.
- The wall control unit should now be reprogrammed and the slow blinking issue should be resolved.
By following these reset and reprogramming steps, you can troubleshoot and potentially resolve the problem of your Chamberlain wall control blinking slowly. If the issue persists, it may be necessary to proceed to the next troubleshooting step or contact Chamberlain support for further assistance.
Replacing the Wall Control Unit
If none of the previous troubleshooting steps have resolved the slow blinking issue of your Chamberlain wall control, it may be necessary to replace the unit. This section will provide you with guidance on how to identify if a replacement is necessary and how to install the new wall control.
A slow blinking wall control often indicates a more significant issue with the unit that cannot be easily fixed. Replacing the wall control can provide a fresh start and potentially resolve the problem.
- First, inspect the wall control for any physical damage, such as cracks or loose connections. If you find any visible damage, it is a strong indication that a replacement is necessary.
- Next, try resetting the wall control by power cycling the opener and reprogramming the unit. If the slow blinking issue persists after the reset, it is likely that the control panel itself is faulty and needs to be replaced.
- When purchasing a new wall control unit, make sure to choose a compatible model that is specifically designed for your Chamberlain garage door opener. Refer to the user manual or contact Chamberlain support for assistance in selecting the appropriate replacement.
- Before installing the new wall control, ensure that the power to the garage door opener is disconnected for safety purposes. This can be done by unplugging the opener from the power source or turning off the circuit breaker that supplies electricity to the garage.
- Carefully remove the old wall control unit by disconnecting the wires from the terminals. Take note of the wire color coding to ensure proper connection with the new wall control.
- Install the new wall control unit by connecting the wires to the corresponding terminals. Double-check the wire connections to prevent any mistakes.
- Once the wiring is secure, mount the new wall control on the wall using the provided screws or mounting bracket, following the manufacturer’s instructions.
- After installation, restore power to the garage door opener by plugging it back in or turning on the circuit breaker.
- Test the functionality of the new wall control by pressing the buttons to operate the garage door. If the slow blinking issue has been resolved, the replacement was successful.
Replacing the wall control unit might be the last resort, but it can be an effective solution to address the slow blinking issue. By following the steps outlined above, you’ll be able to confidently install the new wall control and regain proper functionality for your Chamberlain garage door opener.
Conclusion
In conclusion, troubleshooting and resolving the issue of a Chamberlain wall control blinking slowly is manageable with our comprehensive guide. By carefully checking the wiring connections, clearing any sensor obstructions, resetting the unit, or even replacing the wall control, you will be able to restore the functionality of your garage door opener.
Remember, each troubleshooting step is designed to address a specific potential cause of the slow blinking issue. It is crucial to follow the step-by-step instructions outlined in the previous sections to ensure an accurate diagnosis and effective resolution.
If, despite your best efforts, you encounter any difficulties or feel overwhelmed during the troubleshooting process, do not hesitate to reach out to Chamberlain support. They have a team of knowledgeable professionals who can provide you with additional guidance and assistance to get your garage door opener back up and running smoothly.
FAQ
Why is my Chamberlain wall control blinking slowly?
The slow blinking of your Chamberlain wall control can indicate various issues, including wiring problems, sensor obstructions, or a faulty wall control unit. Understanding the cause is essential for troubleshooting and resolving the problem.
How do I check the wiring connections?
To check the wiring connections, start by inspecting the wires for any damage or looseness. Secure any loose wires and replace any damaged ones. Ensure that the connections are tight and properly attached to the wall control and garage door opener.
What should I do if there are sensor obstructions?
If there are sensor obstructions, locate the safety sensors on each side of your garage door. Clear away any debris, dirt, or objects blocking the sensors’ line of sight. Ensure that the sensors are properly aligned and facing each other.
How do I reset the wall control unit?
To reset the wall control unit, start by disconnecting the power to the garage door opener. Wait for a few minutes, and then restore power. Next, reprogram the wall control unit according to the manufacturer’s instructions. This may involve pressing certain buttons or following a specific sequence.
When should I consider replacing the wall control unit?
If all troubleshooting steps have been exhausted and the slow blinking issue persists, it may be necessary to replace the wall control unit. Consider replacement if the unit is old, visibly damaged, or if other components have already been ruled out as the cause of the problem. Consult the manufacturer’s documentation for guidance on replacing the unit.
How do I contact Chamberlain support?
If you’ve tried all troubleshooting methods and are still experiencing the slow blinking issue, it’s recommended to contact Chamberlain support for further assistance. Visit their official website or refer to the product documentation for the appropriate contact information.